How to Contour Your Face: Step-by-Step Guide
Contouring refers to a makeup technique used to make facial features appear more defined, with the use of shadows and highlights that sculpt the face.
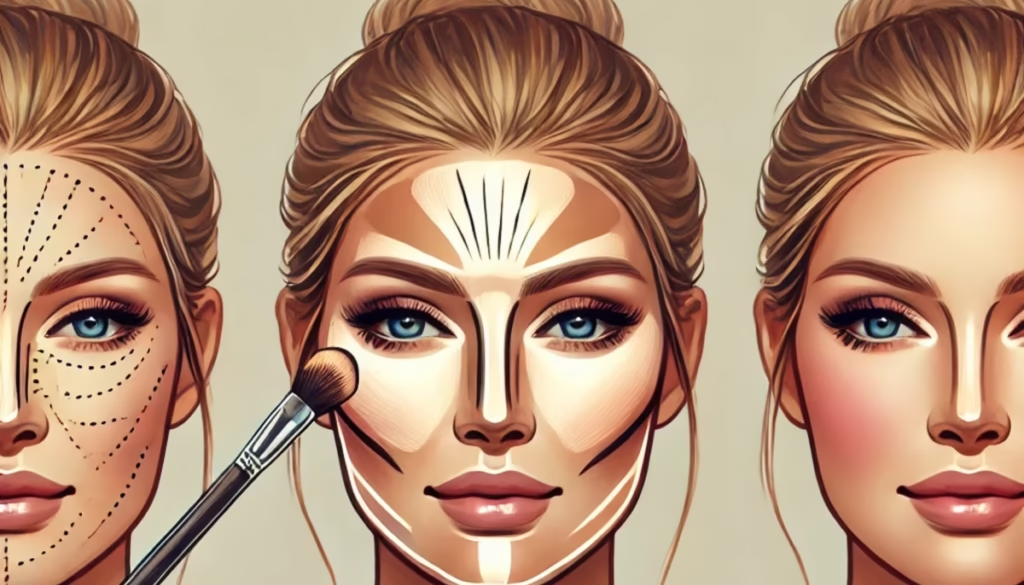
It is created by applying darker shades where the face recedes, including the hollows of cheeks, sides of the nose, and jawline, while using lighter shades on areas that protrude, such as the cheekbones, brow bones, and the bridge of the nose.
This technique will give certain features a slimmer, add depth and dimension to features, and create an overall symmetrical look. Lately, contouring has emerged as a mass beauty phenomenon not only among professional makeup artists but also for casual makeup users.
Contour can sometimes be applied before foundation while, at other times, some prefer to apply foundation initially, as this is a tradition and helps in giving that base for contouring evenly, while some makeup enthusiasts recently chose the method of underpainting, where contour applied first before foundation.
Such an underpainting technique is found by applying contour and blush prior to blending foundation on top-it results in a softer, more natural appearance.
Contouring is often mistaken for bronzing, but they are two different makeup techniques. Contour is used to create shadows and sculpt the face, usually with cool-toned products, while bronzer is used to add warmth and mimic a sun-kissed glow.
Bronzer can sometimes be used to contour, but it is not recommended because of its warm undertones, which make it look less natural in the contouring areas.
However, some bronzers, such as L’Oréal Paris Infallible Fresh Wear Soft Matte Bronzer, can be used as contouring products if the user’s skin tone suits it.
There are so many contouring products available for different tastes and skin types. For example, liquid, cream, stick, and powder contour products are all effective but mostly depend on your type of skin.
For oily skin, the matte powder contour is suitable; however, for dry skin, the cream and liquid contours work best since they are hydrating and blend more smoothly. Cream contours are particularly friendly to newbies since they are easy to blend. Concealers can also be used as a contour.
One popular hack is applying concealer one to two shades deeper than your skin color to contour. The L’Oréal Paris True Match Radiant Serum Concealer, for example, can be used for both contouring and highlighting.
To achieve the best contour, you’ll need both a light highlighter and a darker contour product. Using concealers from the same product line ensures a consistent formula, making it easier to blend.
First, you can use primer to smooth out your face to make it an easy surface for your makeup, and then apply foundation if you’re not using the underpainting method.
Then, concealer in your skin tone can be applied over blemishes or red areas before applying contour. After you’ve applied your foundation, you can apply your contour products.
Apply the lighter concealer shade first on the areas that you would like to emphasize, which includes the under-eyes, the top of the cheekbones, and the bridge of the nose. A little amount could also be applied at the middle of the forehead and chin. To create shadows and define your features, apply the darker contour product to areas such as the hollows of your cheeks, sides of your nose, temples, and jawline. You can also contour other areas for a more dramatic effect, such as underneath the bottom lip for fuller-looking lips. After applying the contour and highlighter, blend the products well using a brush or makeup sponge.
Contour also depends on the shape of the face:
Here are the contouring tips for all different face shapes:
Round Face: Contour the temples, right under the cheekbones and along the jawline to have definition and extend the face’s length.
Oval Face: Contour the outer edges of the forehead, under the cheekbones, and along the jawline for subtle definition.
Square Face: Concentrate contouring to soften angular features on the corners of the forehead, under the cheekbones, and along the jawline.
Heart-Shaped Face: Contour along the temples, under the cheekbones, and under the jawline to balance out the facial proportions.
Rectangle Face: Contour the forehead, temples, and underneath the cheekbones to soften the angles.
Diamond Face: Contour along the temples, under the cheekbones, and along the jawline to balance the width of the cheekbones with the narrower forehead and chin.
Finally, set your makeup in place with a setting spray, such as L’Oréal Paris Infallible Pro-Spray & Set Makeup Extender Setting Spray. This will lock everything in place for a long-lasting sculpted look.
The “3” technique is the easiest contour method for a beginner to master. Draw a “3” shape on either side of your face with a contour product that’s a shade darker than your skin tone. Begin in the middle of your forehead, curve it down toward your cheekbone, and sweep it down toward your jawline.
This technique addresses the key contour areas on the temples, cheekbones, and jawline. Contour applied should then be smoothened using a stippling or buffer brush so that the harsh lines may not be seen.
Finally, add highlighter on top of your cheekbones, brow bones, and temples for the brightening effect.
Contouring is fun and very transformative when applied well. If you are a beginner, knowing your face shape or a more experienced makeup enthusiast will really help you create the best look with sculpted shapes that complement your features.


